Category — Features

Never buy soil again – make it instead!
In a localised, circular economy, we need to make better use of the materials readily available to us. How can we do this in gardening? Could we save money by making our own soil from scratch?

Perhaps you are curious about growing your own food and want to be as self-sufficient as possible. Or are you on a zero waste journey, looking for ways to reduce another source of plastic? You might be like me and mistrust the chemical fertilisers used in commercial soil blends.
Ponder this for a moment… the typical home gardener could be more circular in a true sense than the average commercial grower, few of whom have the time to dedicate to soil making.
Here’s what I have learned over the last couple of years while growing good food in home made soil – compost, seed raising and potting mix.
Compost: noun or verb? Hopefully it’s both in your garden.
Composting is a process of everyday transformation which anybody can practice. It’s a journey that starts with using what is around you and never ends, but evolves over time to include various amendments that enhance the compost and thus your garden with life. Worm farms are a much tidier solution for food scraps in the home setting, so I’ve focused on garden waste. Here’s a brief ‘how to’ – if you follow these instructions, you’ll soon be cancelling your green waste collections or foraging around your neighborhood for them.
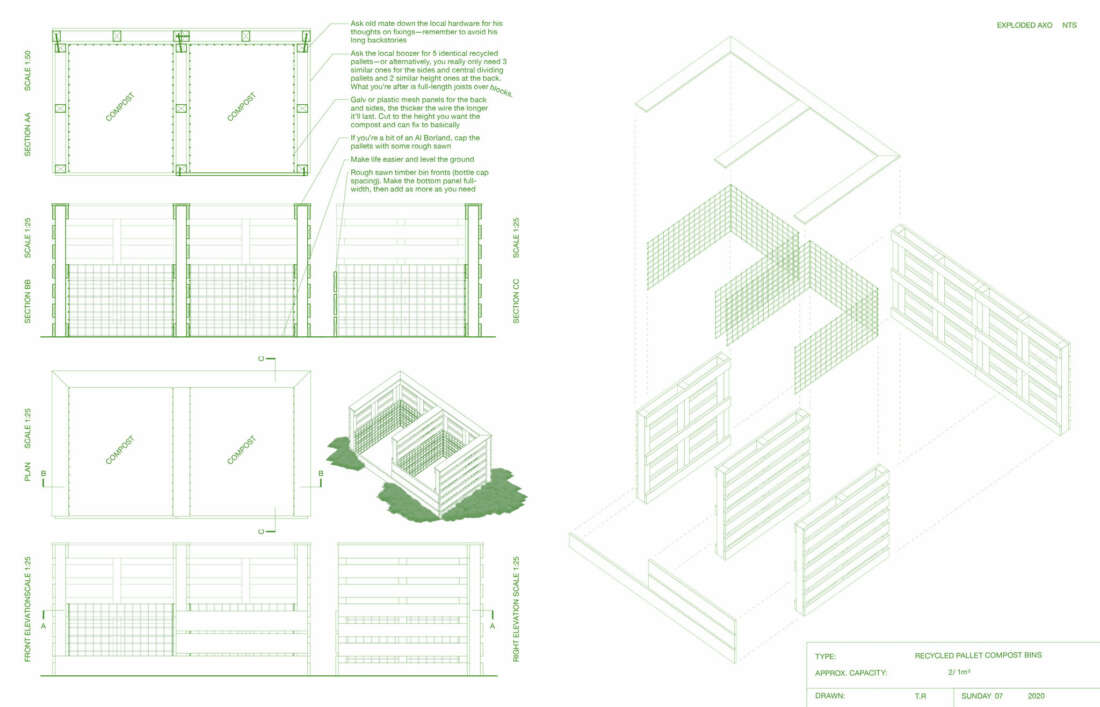
An easy DIY idea for composting loads of garden waste is to get four wooden shipping pallets, available on the side of the road everywhere, tie them into a square enclosure, and build a hot compost pile inside. You can even build a freestanding pile without any structural walls.
What is hot compost? If you build a cubic metre or more in one day, and you get a good mix of greens and browns, air and moisture, then you can enjoy watching the pile heat up. It is a faster process, and similar to commercial operations, will make some invasive weeds harmless and even useful additions to the garden. Warning: this feels like studying alchemy and can become an obsessive hobby, which results in living earth.
“Mum, you know Katrina the gardener? Did you know she actually makes the earth?”
So said an 8 year old student after I showed his class how to make compost. The children at this school had only ever experienced compost as the food scraps that went into the worm farms, and they’d all seen some pretty yucky looking food turning slimy in those bathtubs. But the compost classroom was something altogether different… we emptied four large compost bays, and with every bucket we took out showed the students items that will never ever turn to soil: plastic straws, the lid from the single use soy sauce, hair ties, lolly wrappers, chip packets and hundreds of fruit stickers… but everything else was dark, crumbly soil, all set for the school gardens. In class sized groups we built these four bins again from scratch: mixing grass clippings with other weeds, chicken manure with wood shavings from the chicken coop, some seaweed soaked in a barrel of water. Being a biodynamic practitioner, I took along a few buckets of cow manure to include. The final step with each pile was to add the six herbal biodynamic compost preparations, made using yarrow, chamomile, stinging nettle, dandelion, valerian and oak bark.
Would you like to have a try at home? Here’s how:
Consider the ratios of garden waste you have to use. It can be useful to categorise them into green material (fresh weeds, grass clippings, animal manure) and brown material (branches, autumn leaves, mulch, straw, cardboard). I suggest experimenting with the ratios, and learn from observation. Start by layering or mixing equal volumes of green and brown material. The great thing about composting is that if it doesn’t work the first time, you can use the material in a new batch of compost – it is a fabulous starter for your next pile.
The most overlooked elements when building a large compost pile are air and moisture. You can create air pockets inside the pile by using hollow stalks like sunflowers at the end of the season, or pampas grass stalks, or beginning the compost pile with a kind of a teepee shape constructed with twigs at the bottom. Why air? This helps the pile heat up, and also helps it breathe. Moisture can be hard to manage in summer or in a drought, when things are naturally very dry. Dunking every component in a bucket of water first can be an effective tactic. You could also add the worm leachate from a worm farm, or stew some invasive weeds in rainwater as part of your ongoing weed management.
As a final touch, you can add the six biodynamic compost preparations: five small balls (dandelion, stinging nettle, chamomile, yarrow and oak bard), and then the liquid valerian sprinkled over the top. These herbal remedies also work in a normal home compost bin, you just need to wait until it’s full and ready to rest for a couple of months. You simply roll a pinch of each preparation into a ball of soil, and then insert the balls into evenly spaced holes. Each of the balls should be at least 20cm below the surface.
One of my favourite batches of compost wasn’t even for growing food, but rather to honour the sentiment captured within an enormous pile of memorial flowers.
I live in Titirangi, West Auckland, and there was a tragic death in the area back in December 2018 which meant for a month or so the village roundabout was entirely covered in flowers. As the blooms began to wither, I got the idea to keep them local and make soil. The Auckland Council work crew were touched at the request, and so appreciative of finding a home that wasn’t landfill. I like that they said a karakia before commencing their work that day.
The finished product was so very soft and smooth, with just a few flower stalks remaining. I took this to a neglected garden bed up in the village and planted flowers to add colour to a spot that was otherwise devoid of personality. It’s tricky… many people would say that florists’ flowers are grown in such awful conditions with so many chemicals that it’s pointless making soil from them. What do you think – do they belong in landfill?
If we can make soil from anything that was once alive, then the finished compost could have different uses: some for growing decorative flowers, and then some for growing food.
Do you ever stop and wonder what has gone into your bag of seed raising or potting mix from the garden centre? Whose food scraps, how much compostable packaging, how much glyphosate (Roundup), and what sort of fertilisers? If you’d like to become more discerning, then it’s probably time to start making your own artisanal blends. You’ll minimise your plastic waste and circle the nutrients of your garden back to where they belong.

Seed raising mix – make it yourself, it is so easy
I’ve been on a journey of learning by doing, borne out of necessity. Two and a half years ago I was out of work, facing a few months at home with burnout. My doctor was basically prescribing exercise and rest, wanting me to eat well and take care of myself – to do nothing. The ‘stay home’ message we all experienced through the lockdown in April/May of 2020 was my lifestyle at the time.
The result was that for about six months the only way I could afford vegetables was to grow them. Thankfully I’d been a compost addict for a few years already and also had jars and jars of seeds saved, so it was an absolute pleasure to dig in – quite literally.
When it came to seed raising mix, there was no way I could make my tiny budget stretch far enough to buy bagged soil. So, I asked Google for ideas, and the experiment began. It was like George’s Marvellous Medicine: each batch a little different. The only tool to gauge the quality of each blend was my hands, along with feedback from the plants I grew.
My students repeatedly asked me for a recipe. One day I found myself low on my favourite ingredients and had to make up a large batch of seed raising mix for a microgreens workshop that weekend. I decided to try equal amounts of pumice sand, sifted compost and coconut coir. These three ingredients were the only ones that I could buy in bulk and easily package up for students. The blend worked! In fact, it worked really, really well. And so I’ve kept using this as my basic recipe, but to be honest, if I’m growing for myself at home, I always prefer using leaf mould and worm castings rather than coconut coir. Here’s my 2019 recipe:
Coconut coir / Pumice Sand / Sifted compost. Use equal parts of each and mix together. Experiment with worm castings instead of compost if you have some.
DIY Potting Mix
I love it when I can make something and say ‘you cannot buy this – anywhere.’ My potting mix is a little like this, and I’d love to see more people making their own. Here’s what goes into the Blue Borage blend.
Leaf Mould
Gather up fallen leaves (all year round), turn them once a month or so, and within 1-2 years you will have soft, crumbly soil. It’s a little like that soft top layer in the forest, with the refreshing smell of fresh earth and nature. Leaf mould can absorb a lot of moisture, and adds a light, airy quality to potting mix.
Why aren’t more people making this? One reason is possibly that it takes a bit of time. We just aren’t very good at waiting, right? My challenge to you this season is to gather up a good cubic metre of leaves. Put them into a garden waste bag, a wool fadge, a dedicated compost bin, or just build a chicken wire netting enclosure to hold them. A handy tip: try using a compost aerator for turning the leaves – it makes the task so quick and easy. An aerator looks like a large corkscrew, about 1.5 metres long. You can get a lovely one from Crafty Gatherer, or a cheaper version at Bunnings or Mitre 10.
You can use any leaves, my favourite have been foraged from a garden with a couple of puriri trees and a cherry blossom tree, which I’ve blended together with oak leaves from my garden at home. I’ve been experimenting with loquat leaves in a separate batch all on their own, and the finished leaf mould is very oily and more dense – a very different finished product to the other leaf mould.
Worm Castings
This ingredient is quite literally black gold. There are worm farms all over the place full of beautiful worm castings, and people often don’t value what’s inside. I suspect we have traditionally seen worm farms as waste management systems, but perhaps the time has come to upgrade their status to that of a backyard soil making operation.
Some Blue Borage tips for worm farms:
What to feed worms: I feed my worms much more than food scraps. They get weeds from the garden including tricky weeds like agapanthus bulbs, along with shredded paper, cardboard, raw wool from a spinning friend, and occasionally a large amount of ‘half done’ compost from my large grey plastic bins.
Harvesting finished worm castings: First, I use five large shallow boxes and spread a batch of worm castings out. There are often worms mixed in, so I let them crawl away from the light, and gently remove the top layer, repeating every 30 minutes or so until I get a condensed batch of worms that can all go back into a worm farm.
Leachate: The liquid that drips out the bottom is probably best tipped into your compost bin.
Worm tea: To make worm tea, start with the finished worm castings and stir them in water.
To find more advice on worm farming, there’s an excellent webinar from the Institute of Local Self Reliance featuring Rhonda Sherman’s 2019 book ‘The Worm Farmer’s Handbook’: https://ilsr.org/webinar-vermicomposting-january-2019/.
Biodynamic CPP (Cow Pat Pit)
This is the magic I add to my potting mix regularly. To Make CPP: knead cow manure for an hour or so, add a little crushed egg shell and some volcanic rock dust. Store underground in terracotta pots after adding the six biodynamic herbal compost preparations (yarrow, chamomile, stinging nettle, valerian, dandelion and oak bark).
The CPP is a relatively easy preparation to use in the home garden: you just stir a small handful in a bucket of water for 15 minutes. Make a vortex clockwise then anticlockwise, changing directions every now and then. When done, pour the liquid into container gardens, sprinkle over your garden beds, add to a batch of potting mix, or use to feed seedlings when they are about to be transplanted.
Biodynamic Compost
Use the biodynamic compost preparations to enhance what you are already making. For more information on composting with biodynamics methods see the full range of demeter certified growers listed Biodynamic Association of New Zealand website: https://biodynamic.org.nz/
My current recipe for potting mix:
40% biodynamic compost
20% worm castings
20% leaf mould
10% garden soil
5% well aged mulch
5% well aged chicken manure
To follow the ongoing journey of soil making, come see Blue Borage online. Good luck making your own blend!
Blue Borage hosts regular composting workshops where you can experience this method either in person in Auckland or via the Blue Borage online classroom.
By Katrina Wolff. Photography: Jess Murphy. Plans: Tom Ryan